Table of Contents
- Adobe Illustrator Beyond Vector Graphics
- How to Prepare Your Design
- Applying 3D Effects in Illustrator
- Using Materials and Lighting
- How to Map Graphics onto 3D Objects
- Exporting 3D Models for AR
- Understanding GLTF, USDZ, and OBJ Formats
- How to View Models in Augmented Reality
- Using Adobe Aero for AR Experiences
- Best Practices for 3D and AR Design
- Frequently Asked Questions
Many designers primarily associate Adobe Illustrator with vector graphics and logo design, but the software also includes powerful 3D tools capable of creating realistic objects and augmented reality assets.
With the introduction of the 3D and Materials panel, Adobe Illustrator has evolved into a more versatile creative platform that allows designers to build immersive 3D experiences directly from vector artwork.
These tools make it possible to transform flat illustrations into 3D objects and export them in formats compatible with augmented reality (AR) platforms and viewers.
In this guide, you will learn how to create 3D objects inside Adobe Illustrator, customize materials and lighting, export AR-ready files, and preview them using augmented reality applications.
Adobe Illustrator Beyond Vector Graphics
Adobe Illustrator is widely recognized for vector illustration, branding, typography, and digital artwork.
However, modern versions of Illustrator include advanced 3D capabilities that enable:
- 3D extrusion
- Revolved objects
- Inflatable shapes
- Material mapping
- Lighting effects
- Augmented reality exports
These features allow designers to create professional-looking 3D assets without requiring dedicated 3D modeling software.
How to Prepare Your Design
Before creating a 3D object, you should first prepare a clean vector design inside Adobe Illustrator.
Best Types of Base Artwork
- Text objects
- Geometric shapes
- Custom vector paths
- Logos and icons
- Illustrations
For the best results, keep the artwork simple and well-structured.
Important Design Recommendations
- Avoid overlapping strokes
- Reduce excessive transparency effects
- Use clean vector paths
- Organize layers properly
- Convert text to outlines if necessary
Well-prepared artwork makes 3D conversion smoother and improves export compatibility.
Applying 3D Effects in Illustrator
Once your vector artwork is ready, you can begin transforming it into a 3D object.
How to Open the 3D Panel
Navigate to:
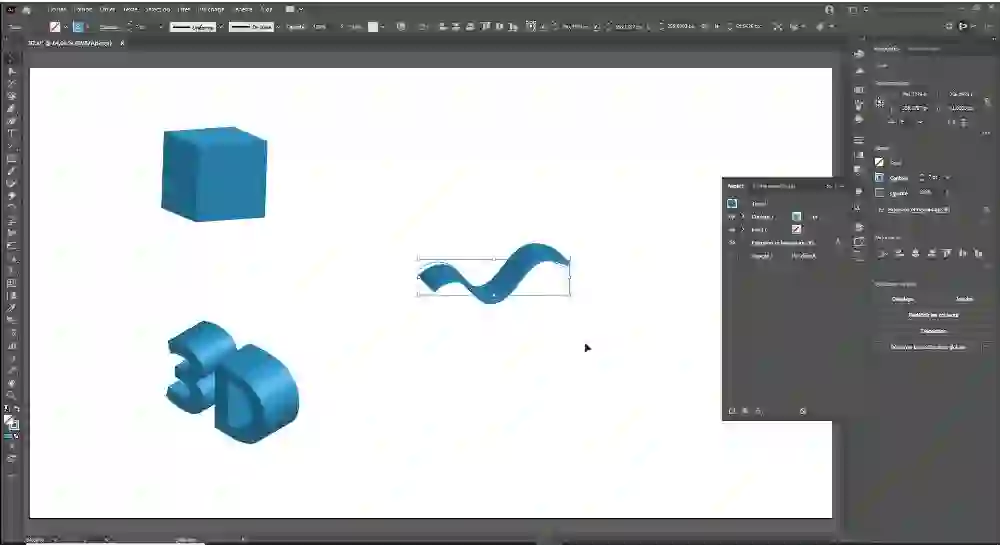
Effect > 3D and Materials > Extrude & Bevel
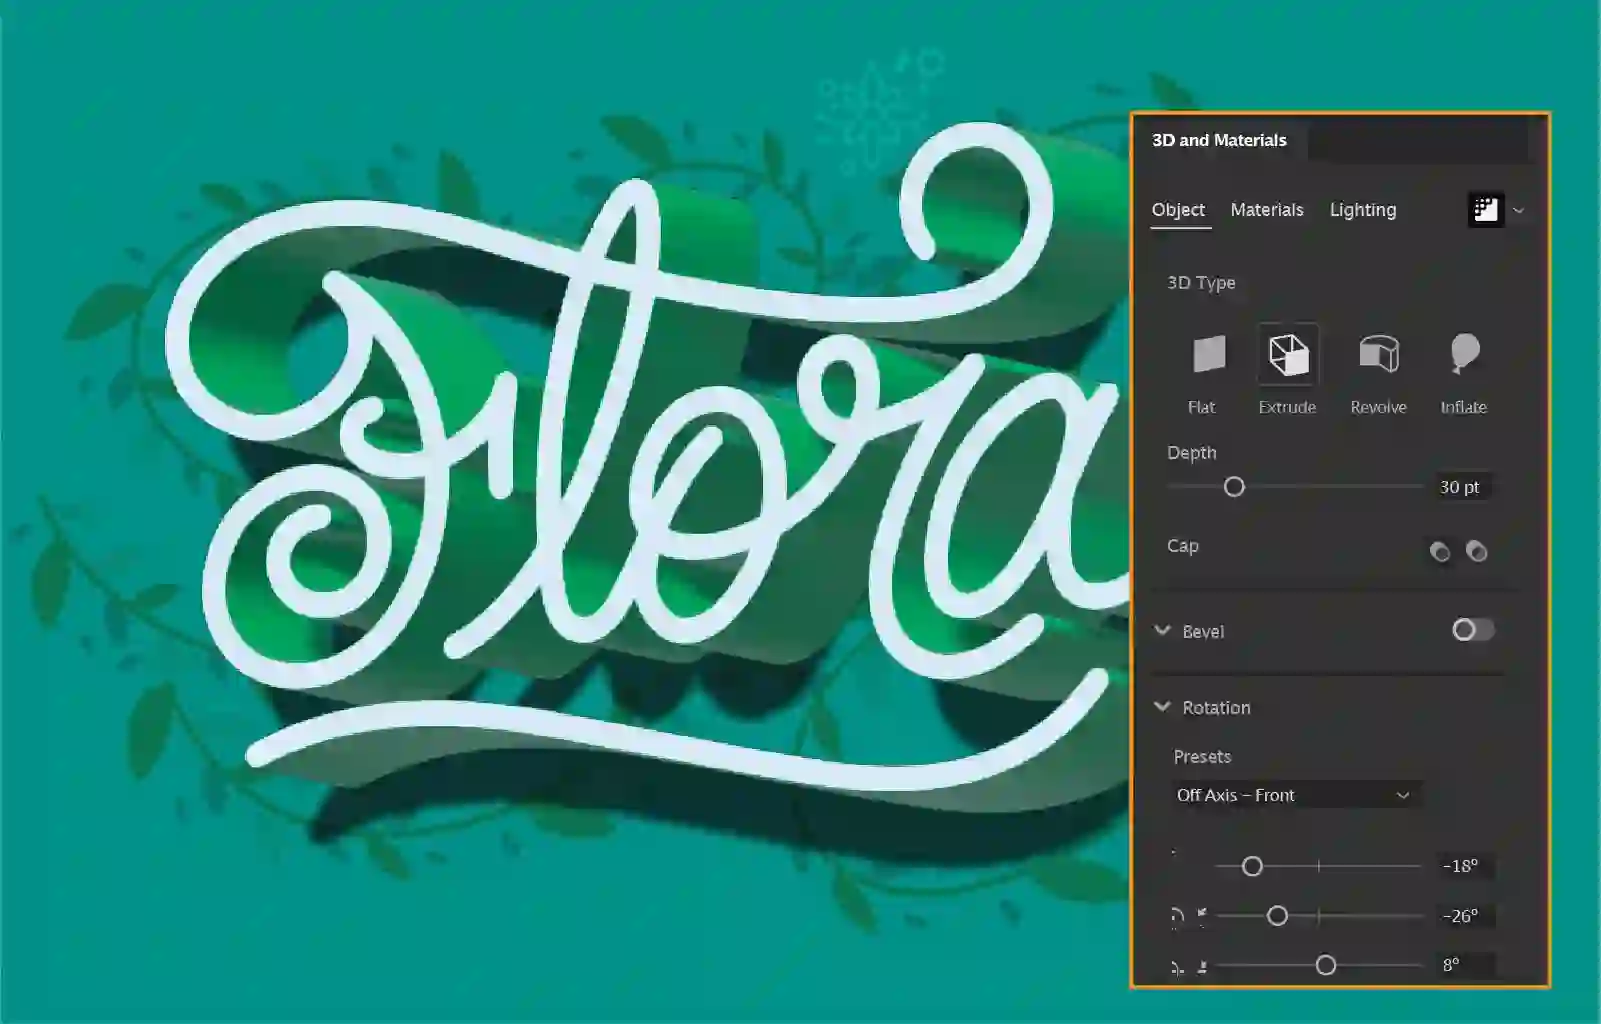
The 3D and Materials panel gives access to several important 3D effects.
Main 3D Effects
1. Extrude & Bevel
Adds depth to flat vector artwork and creates solid 3D forms.
2. Revolve
Creates cylindrical and rounded shapes such as bottles, pipes, and containers.
3. Inflate
Applies a balloon-like inflated effect to objects.
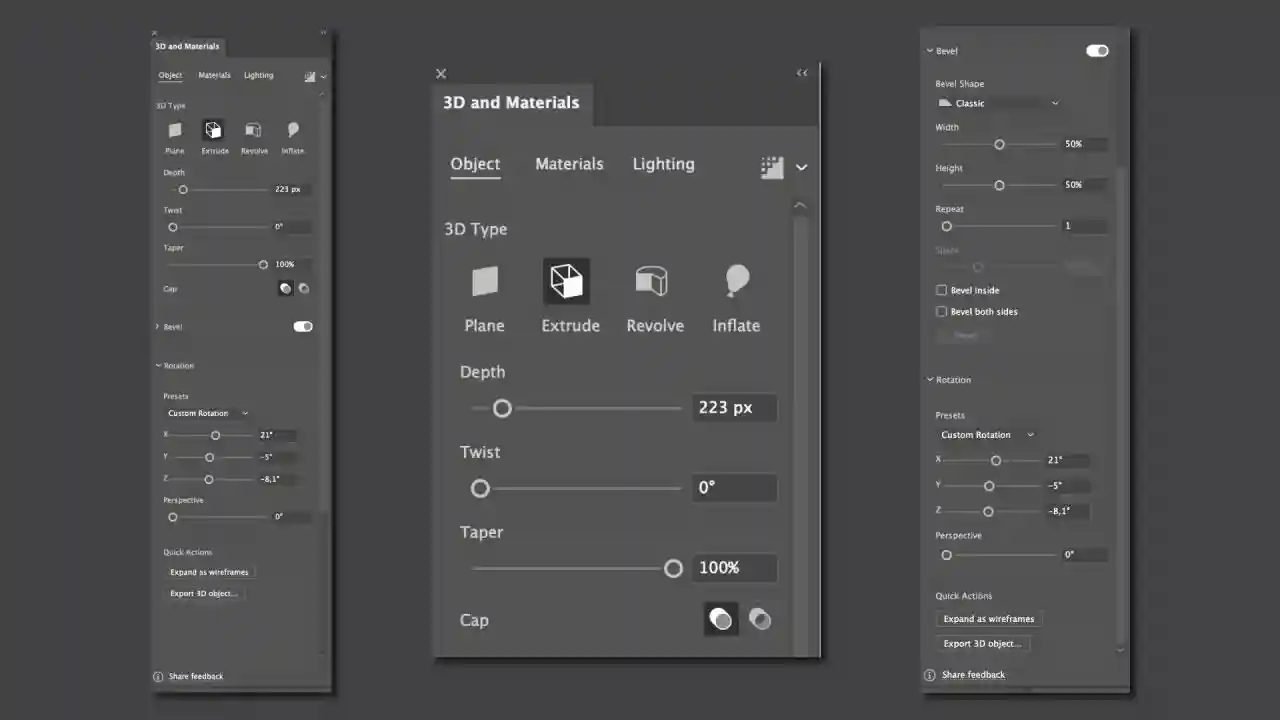
Customization Settings
Illustrator allows adjustment of:
- Depth
- Rotation
- Perspective
- Surface shading
- Camera angle
- Object positioning
These settings provide significant creative flexibility when building 3D assets.
Using Materials and Lighting
The Materials tab allows users to apply realistic textures and surfaces to 3D models.
Available Material Types
- Plastic
- Metal
- Wood
- Glass
- Matte surfaces
- Reflective materials
Adobe Illustrator also supports importing additional materials from Adobe Substance assets.
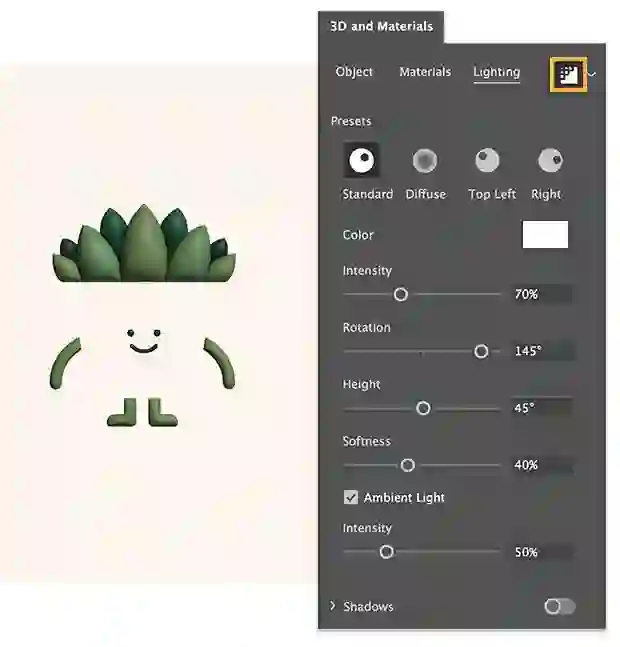
Lighting Controls
The Lighting tab provides several lighting presets including:
- Standard
- Diffuse
- Upper Left
- Right
Users can customize:
- Light intensity
- Shadow softness
- Rotation
- Reflection quality
Ray Tracing Performance Warning
Illustrator includes a Ray Tracing option for highly realistic rendering.
However, enabling Ray Tracing may significantly increase rendering times on less powerful computers.
How to Map Graphics onto 3D Objects
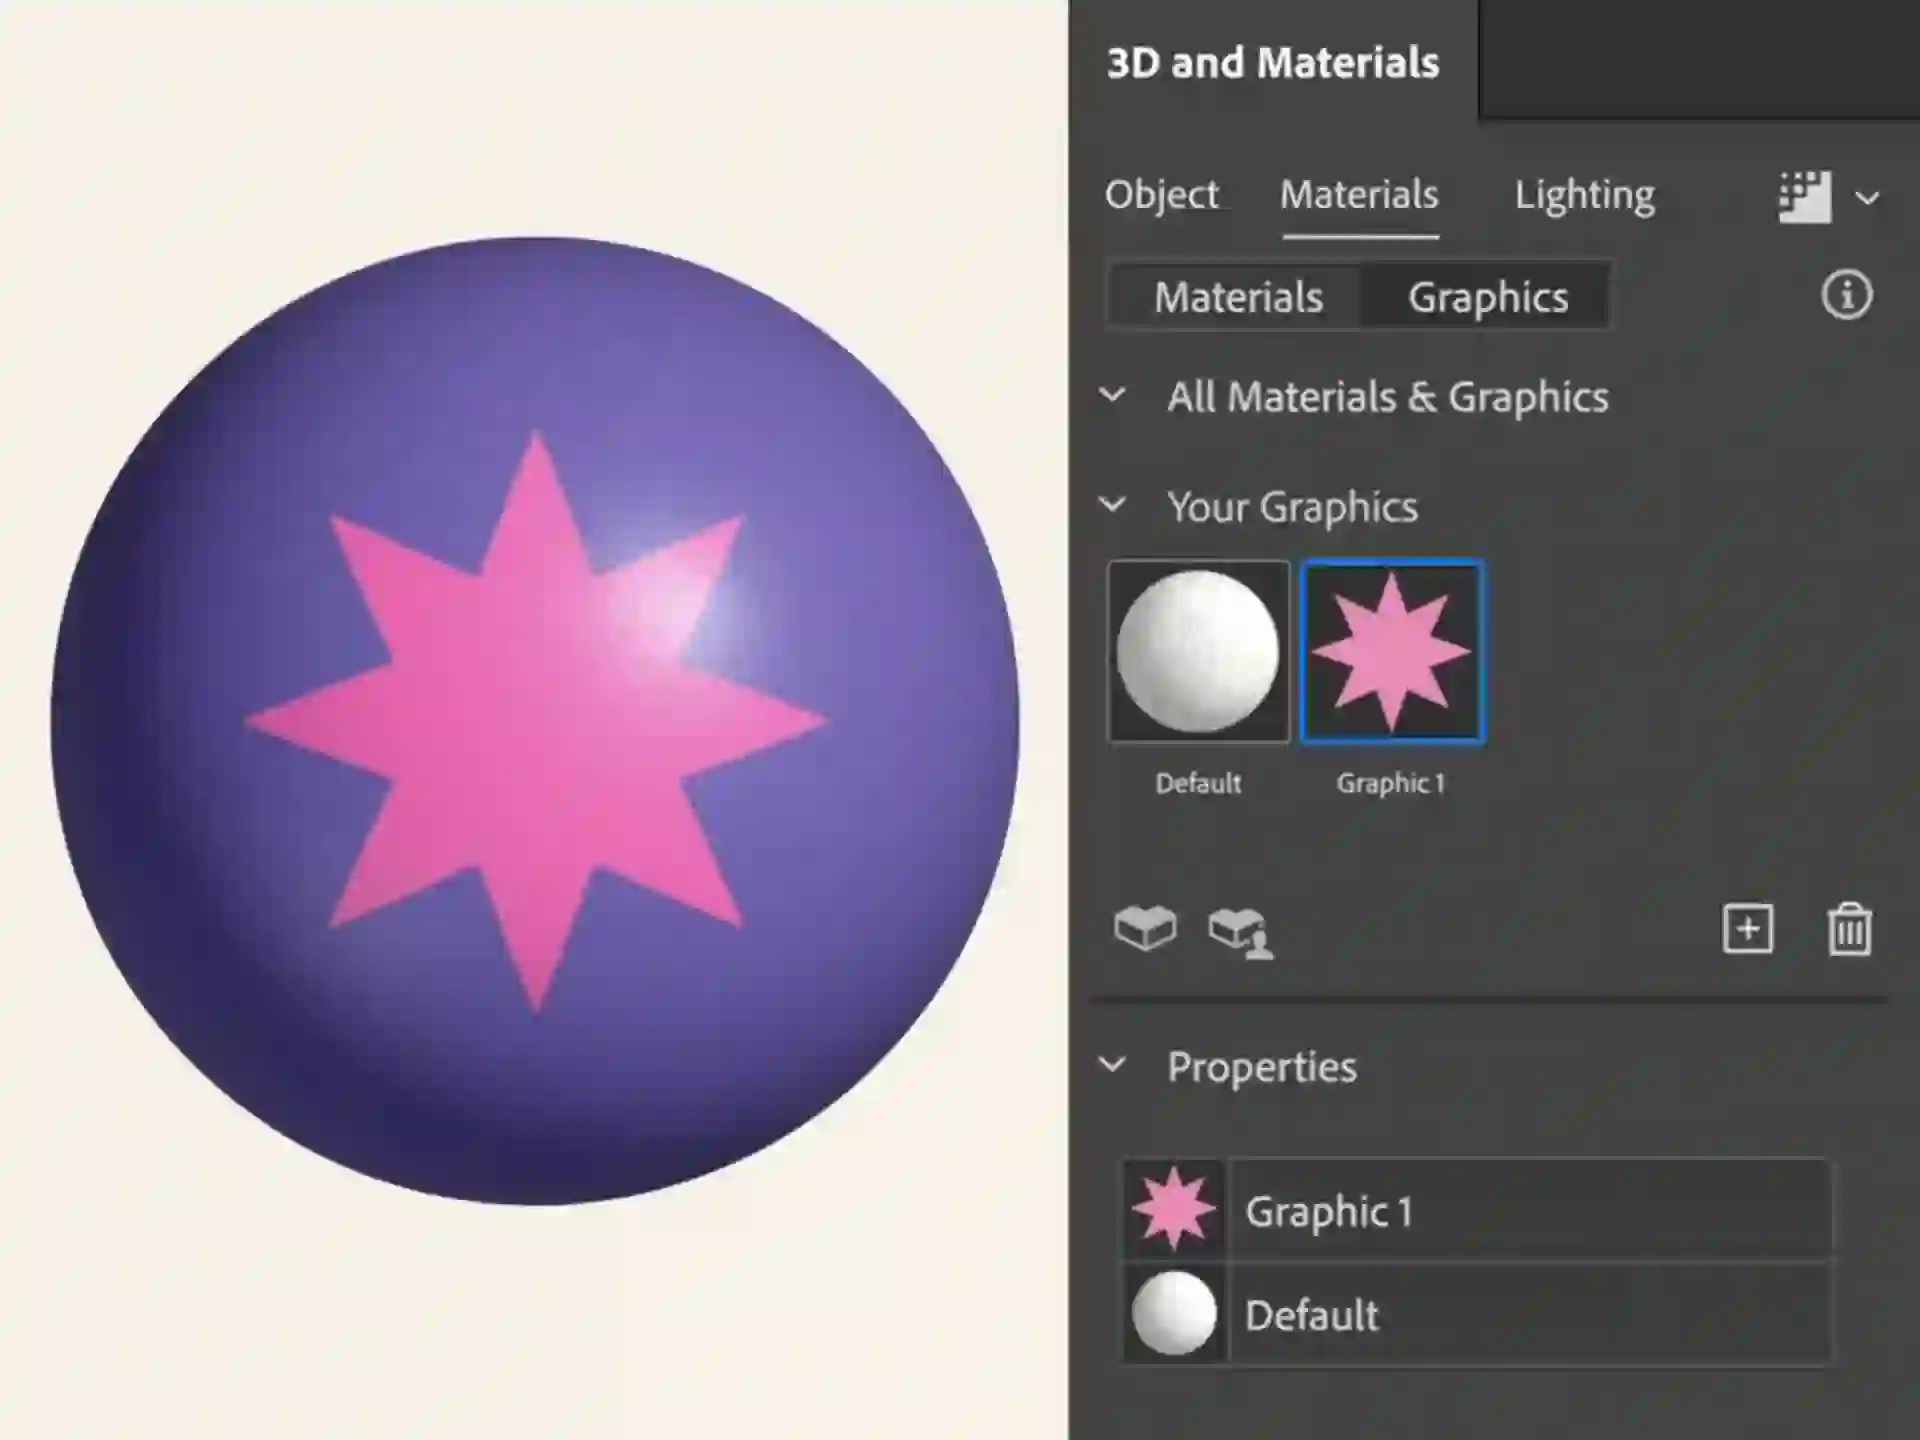
Illustrator also supports graphic mapping, allowing designers to apply custom artwork directly onto 3D surfaces.
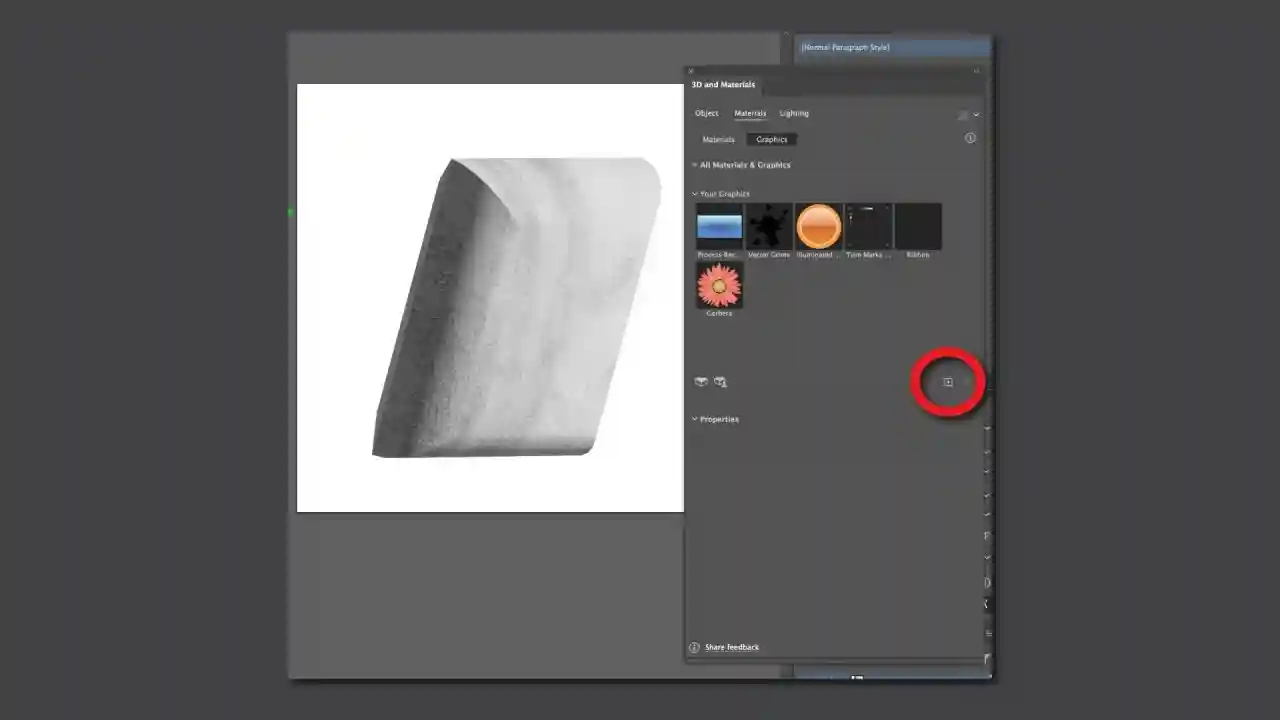
How to Add Graphics to 3D Models
- Select your artwork
- Open the 3D and Materials panel
- Go to the Materials tab
- Click the “+” button
- Select “Add as a Single Graphic”
You can also drag and drop graphics directly into the panel.
Applying the Graphic
- Select the target 3D object
- Choose the imported graphic from “Your Graphics”
- Adjust positioning and scaling
This feature is especially useful for packaging design, branding mockups, and product visualization.
Exporting 3D Models for AR
After completing your design, the next step is exporting the object in a format compatible with augmented reality applications.
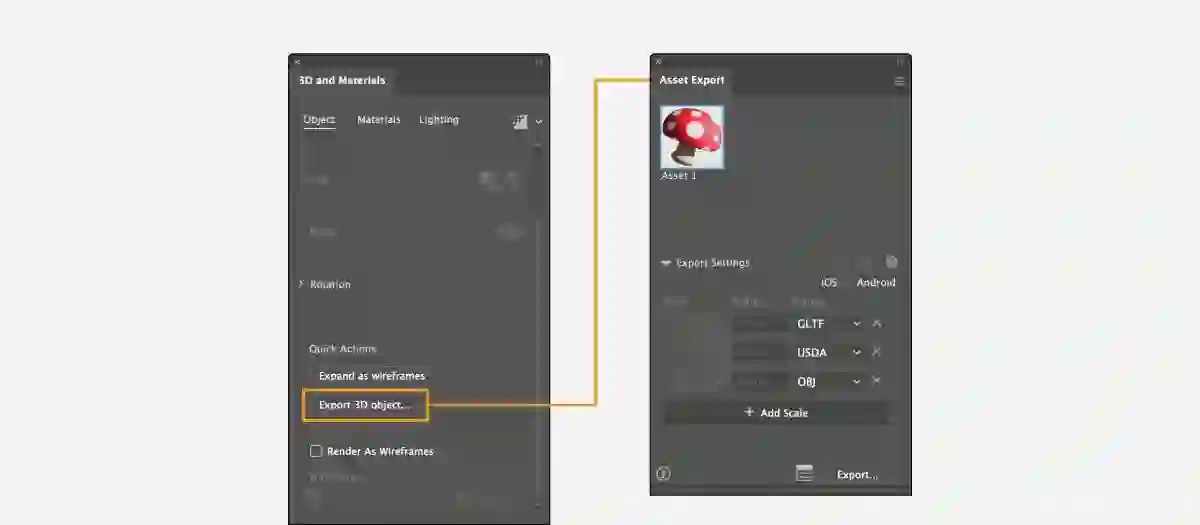
How to Open Asset Export
Navigate to:
Window > Asset Export
Export Process
- Select the 3D object
- Drag it into the Asset Export panel
- Choose the export format
- Click Export
Illustrator supports several widely used 3D file formats.
Understanding GLTF, USDZ, and OBJ Formats
GLTF (.gltf / .glb)
GLTF is a lightweight 3D format optimized for:
- Web browsers
- Mobile devices
- Augmented reality platforms
- WebAR experiences
USDZ (.usd / .usdz)
USDZ was developed by Apple and Pixar and is highly compatible with:
- iPhone and iPad devices
- Apple AR Quick Look
- Adobe Aero
- iOS augmented reality apps
OBJ
OBJ is a traditional 3D format compatible with most modeling software.
However, it may not preserve all advanced material properties during export.
How to View Models in Augmented Reality
Once exported, your 3D object can be viewed using various augmented reality platforms.
AR Viewing Options
- Adobe Aero
- Apple AR Quick Look
- WebAR platforms
- Mobile AR viewers
- Browser-based AR tools
Users can place 3D objects into real-world environments using smartphone or tablet cameras.
Most platforms also support:
- Object scaling
- Rotation controls
- Position adjustments
- Photo and video capture
Using Adobe Aero for AR Experiences
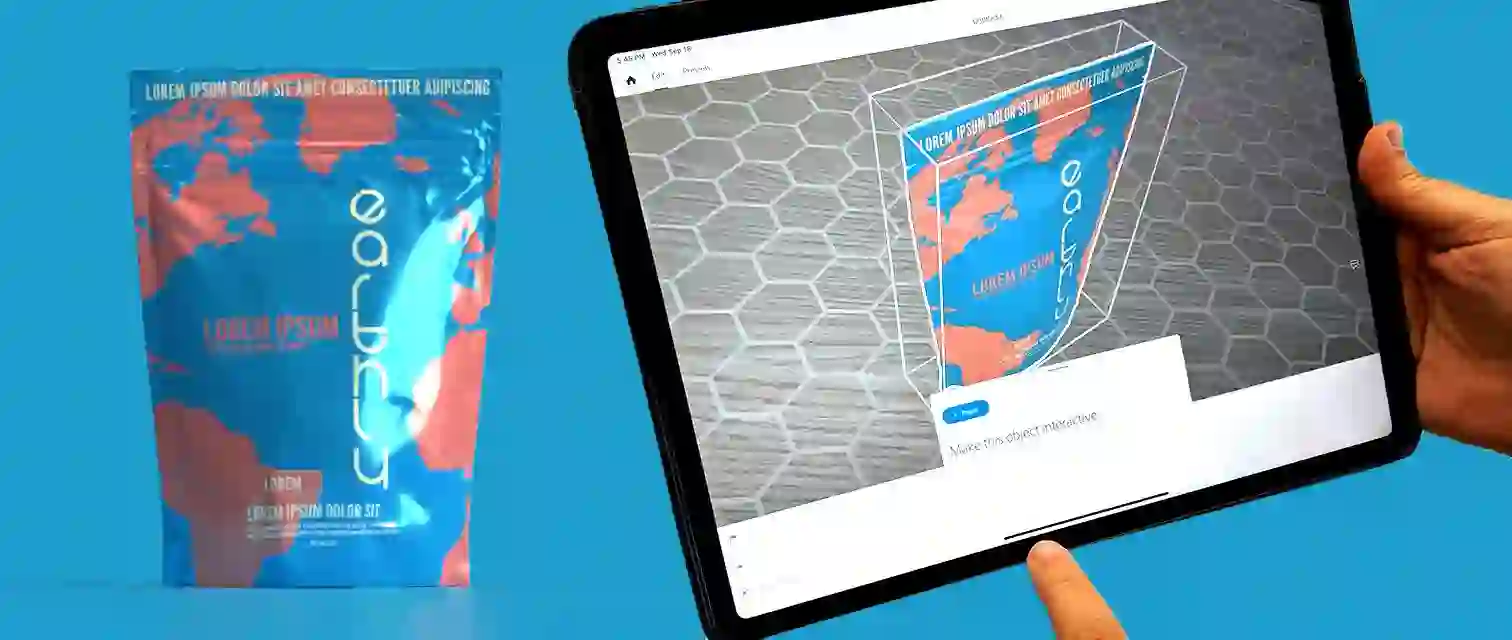
Adobe Aero is one of the most accessible tools for viewing Illustrator-generated 3D assets in augmented reality.
What Adobe Aero Allows
- Import GLTF and USDZ files
- Create interactive AR scenes
- Position objects in physical spaces
- Preview immersive experiences
However, Adobe announced plans to discontinue support for Adobe Aero on November 6, 2025.
Designers interested in AR workflows may want to explore alternative WebAR platforms and future Adobe ecosystem developments.
Best Practices for 3D and AR Design
Creating efficient 3D and AR-ready assets requires balancing visual quality with performance optimization.
Recommended Best Practices
- Keep polygon complexity low
- Use optimized textures
- Test models on mobile devices
- Avoid excessive lighting effects
- Export lightweight formats for web usage
- Maintain organized Illustrator layers
Efficient optimization ensures smoother performance across smartphones, tablets, browsers, and AR platforms.
Final Thoughts
Adobe Illustrator has evolved far beyond traditional vector illustration software.
Its integrated 3D and Materials tools allow designers to create immersive 3D assets and export them directly for augmented reality experiences.
By understanding extrusion effects, materials, lighting, graphic mapping, and export workflows, designers can expand their creative possibilities without leaving Illustrator.
As augmented reality technology continues growing across industries such as marketing, gaming, education, and e-commerce, mastering AR-ready design workflows may become increasingly valuable for digital creators.
Frequently Asked Questions
Can Adobe Illustrator create real 3D objects?
Yes, Illustrator includes 3D tools such as Extrude, Revolve, and Inflate for creating realistic 3D models.
Which export format is best for augmented reality?
GLTF and USDZ are among the best formats for AR experiences and mobile compatibility.
Can Illustrator export AR-ready files?
Yes, Illustrator supports exporting GLTF, GLB, USDZ, and OBJ formats suitable for AR platforms.
What is Adobe Aero used for?
Adobe Aero allows users to place and preview 3D models in augmented reality environments.
Does Illustrator support material and lighting customization?
Yes, Illustrator includes customizable materials, lighting presets, and ray tracing options.Though not many realize it, Adobe Illustrator incorporates nice design instruments that transcend vector graphics. At present we are going to concentrate on one in every of them, 3D form creation and its export in codecs appropriate with augmented actuality (AR).
Subsequent, we clarify step-by-step find out how to create a 3D object inside Adobe Illustrator and find out how to export it accurately to view it in an AR viewer.
Earlier than changing your illustration right into a 3D object, create or choose the vector artwork that can function the bottom. It may be textual content, a geometrical form, or any path created with the basic instruments of Adobe Illustrator.
It’s advisable to maintain the design clear and well-defined, with out overlapping strokes or advanced transparencies, as this may facilitate its conversion to quantity.
Apply 3D results
Upon getting your form prepared, open the 3D and Supplies panel by way of Results > 3D and Supplies > Extrude & Bevel. As you will notice, you may have plenty of 3D choices at your disposal:
- Extrude & Bevel: will make it easier to add depth to a flat form.
- Revolve: with this you’ll create cylindrical shapes, corresponding to a pipe.
- Inflate: to offer quantity to things within the fashion of a balloon.
Throughout the panel, you will notice many various settings that can make it easier to customise your object to the fullest, corresponding to depth, rotation, and many others.
Illustrator lets you use predefined supplies (plastic, steel, wooden, and many others.) which you could entry from the Supplies tab, situated within the 3D and Supplies panel. From there, you can even add supplies from the Adobe Substance assets.
On the left facet, you’ll discover the Lighting tab, from the place you may modify the lighting. You’ll be able to apply preconfigured results corresponding to Customary, Diffuse, Higher Left, or Proper. Illustrator additionally has a Ray Tracing mode, which we advise you to not activate in the event you wouldn’t have a robust PC. When you in the end determine to activate it, you’ll expertise increased response occasions, relying on the complexity of the item.
Moreover, you can even map illustrations onto the floor of any 3D object. To do that, return to the 3D and Supplies panel and go to the Supplies tab.
- Together with your design open in Illustrator, maintain it chosen and go to the 3D and Supplies panel once more.
- In Supplies, click on on the + button and choose Add as a single graphic. You may also drag your design and drop it immediately into the panel.
- Choose the 3D object you need to map after which click on in your design, which you’ll discover within the Your Graphics panel.
Export your 3D mannequin
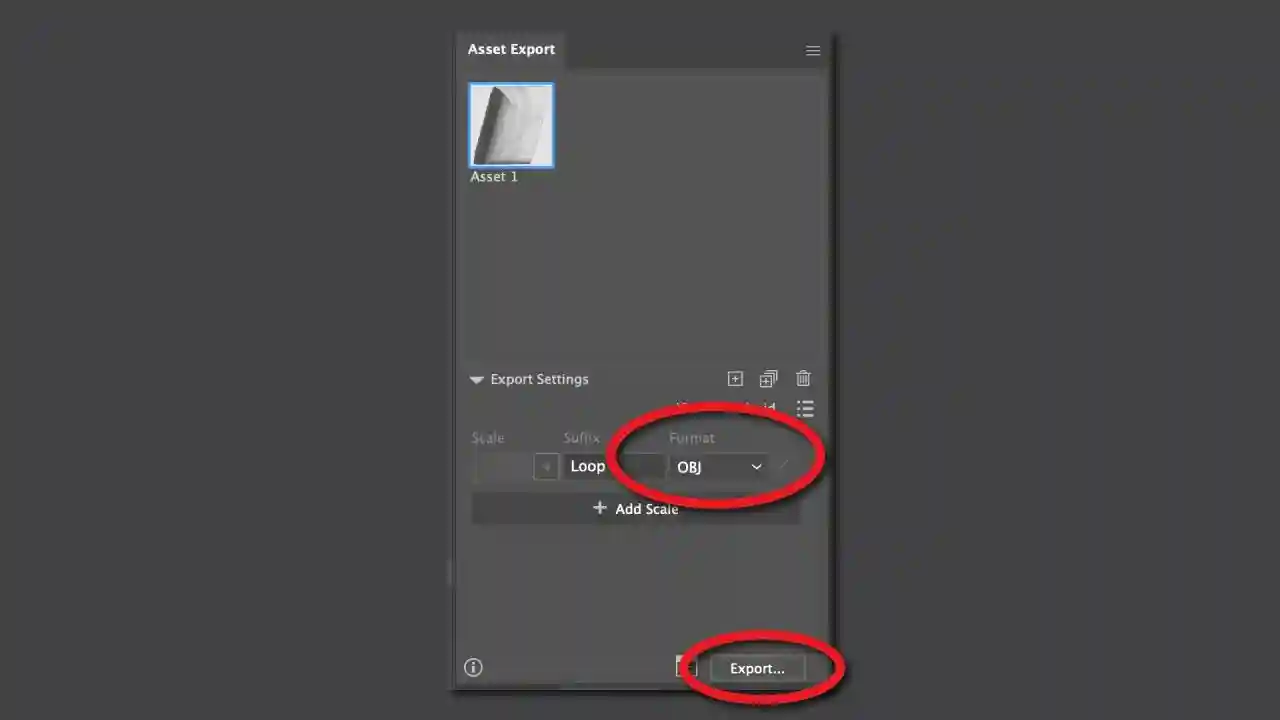
As soon as glad with the consequence, it’s time to export your creation in a format appropriate with augmented actuality. From the highest menu, choose Window > Asset Export.
- Choose the 3D object and drag and drop it into the Asset Export panel.
- Within the Format part, select one of many following codecs:
- GLTF (.gltf / .glb): light-weight format ideally suited for AR visualization, net browsers, or cell gadgets.
- USDZ (.usd / .usdz): format developed by Apple and Pixar, particularly helpful if you’re going to use iOS gadgets or apps like Adobe Aero.
- OBJ: basic format appropriate with most 3D applications, though it might not retain all supplies.
- Upon getting chosen the format, choose the item once more within the Asset Export panel and click on on Export.. to complete.
The way to view your design in augmented actuality
With the exported file, the following step is to view it in AR.There are a number of choices, relying on the gadget or platform you utilize.
Adobe Aero, for instance, lets you import 3D fashions (GLTF or USDZ) and place them immediately in an actual atmosphere by way of the digital camera of your cell phone or pill. (Take into account that Adobe plans to withdraw assist for Aero on November 6, 2025, so it’s advisable to make use of it whereas it’s accessible).
Then again, in the event you export in USDZ format, you may open the file immediately from the browser or file supervisor and look at it in AR with out the necessity for extra functions. You even have WebAR platforms accessible, that are on-line viewers that help you load GLTF or GLB information to view them in augmented actuality from any gadget with a digital camera.
When opening your mannequin, you may alter its scale, rotation, and place within the atmosphere, and even seize photographs or movies of the way it appears built-in into the true world.